
How to Create Training Presentations with AI: A Step-by-Step Guide

Wikidoc Team
4 November 2026
A tan leather sofa beneath an arched mirror, with a round coffee table, a patterned rug and a leafy plant

Introduction

Every business runs training sessions: inductions, compliance refreshers, new system rollouts, product updates. And every one of them starts the same way, with someone staring at a blank PowerPoint, copying paragraphs out of a policy and trying to make them fit on a slide.

Generic AI presentation tools help with the design, but they write from a prompt, not from your policy. What you need for training is a deck built from your procedures, structured like a lesson, with a way to check people understood it. This guide shows how to do that in Wikidoc in seven steps.

What is a company training presentation?

A company training presentation is a slide deck used to teach employees a skill, process or policy. It’s delivered live by a trainer or manager, in a room or on a video call, or shared for people to read in their own time. Typical examples are an induction session, a compliance refresher, a new procedure rollout, or a product update for the sales team.

What sets it apart from other decks is the goal. A sales deck persuades and a board deck reports; a training deck has to change what people do. So it’s judged on one thing: after the session, can people perform the task correctly?

What makes a good training presentation

A training deck isn’t a sales deck. The best ones share a structure:

  1. Learning objectives up front, so people know what they’ll be able to do afterwards.
  2. One idea per slide, in the layout that suits it: numbered steps for a process, a comparison for do’s and don’ts, a callout for a warning.
  3. Speaker notes, so anyone can deliver it, not just the person who wrote it.
  4. Knowledge checks between sections, not just at the end.
  5. A summary and a quiz, so you know it landed.

Good training decks also follow a few design rules:

  • Less text per slide. Keywords and short bullets on the slide; the detail goes in the speaker notes.
  • Real examples from your business. Your products, your systems, your customers. “A customer returns a $180 jacket without a receipt” teaches more than “handle returns appropriately”.
  • The why behind each rule. People remember a rule when they know what it protects against.
  • Visual consistency. One template, consistent colours and layouts, so people focus on the content, not the design.
  • Accessible. Readable font sizes, enough colour contrast, and alt text on images.
  • Reusable. Clear enough that someone other than the author can deliver it next time.

Wikidoc plans every training deck this way automatically.

Use cases for small businesses

  • New starter induction: your story, values, team, tools and day-one essentials.
  • Standard procedures: customer refunds, opening and closing, stock takes, job hand-overs.
  • Compliance refreshers: privacy, workplace health and safety, anti-harassment, food safety.
  • Customer service standards: how you greet, handle complaints and escalate.
  • Product and service knowledge: a new range, a pricing change or a new service for front-line staff.
  • Team briefings on change: a new supplier, a revised policy or a new system, explained in ten slides.
  • Manager training: how to run one-on-ones, approve leave or handle performance conversations.
  • Toolbox talks: short safety briefings on site, presented from a phone or tablet.

Our example: a customer refund procedure

Throughout this guide we’ll use a common small-business example: training front-of-house staff on the customer refund procedure. The source is a two-page Word document that covers who can approve refunds, refund limits, what to do when there’s no receipt, store credit versus cash refunds, and how to record each refund in the point-of-sale system. Mistakes here cost money and customers, so it’s exactly the kind of procedure worth training properly.

Create a training presentation with AI in 7 steps

Step 1: Start a new document and add your sources

From Home, click + Create new and choose Documentation. On the Sources tab, add the material the training should be based on. In our example, that’s the Customer refund procedure Word document. You could also add the returns policy you show customers, or a recording of a manager explaining how they handle tricky refunds. Wikidoc accepts Word, PDF, PowerPoint, Excel, audio and video files, up to 5 per document on Pro and Team.
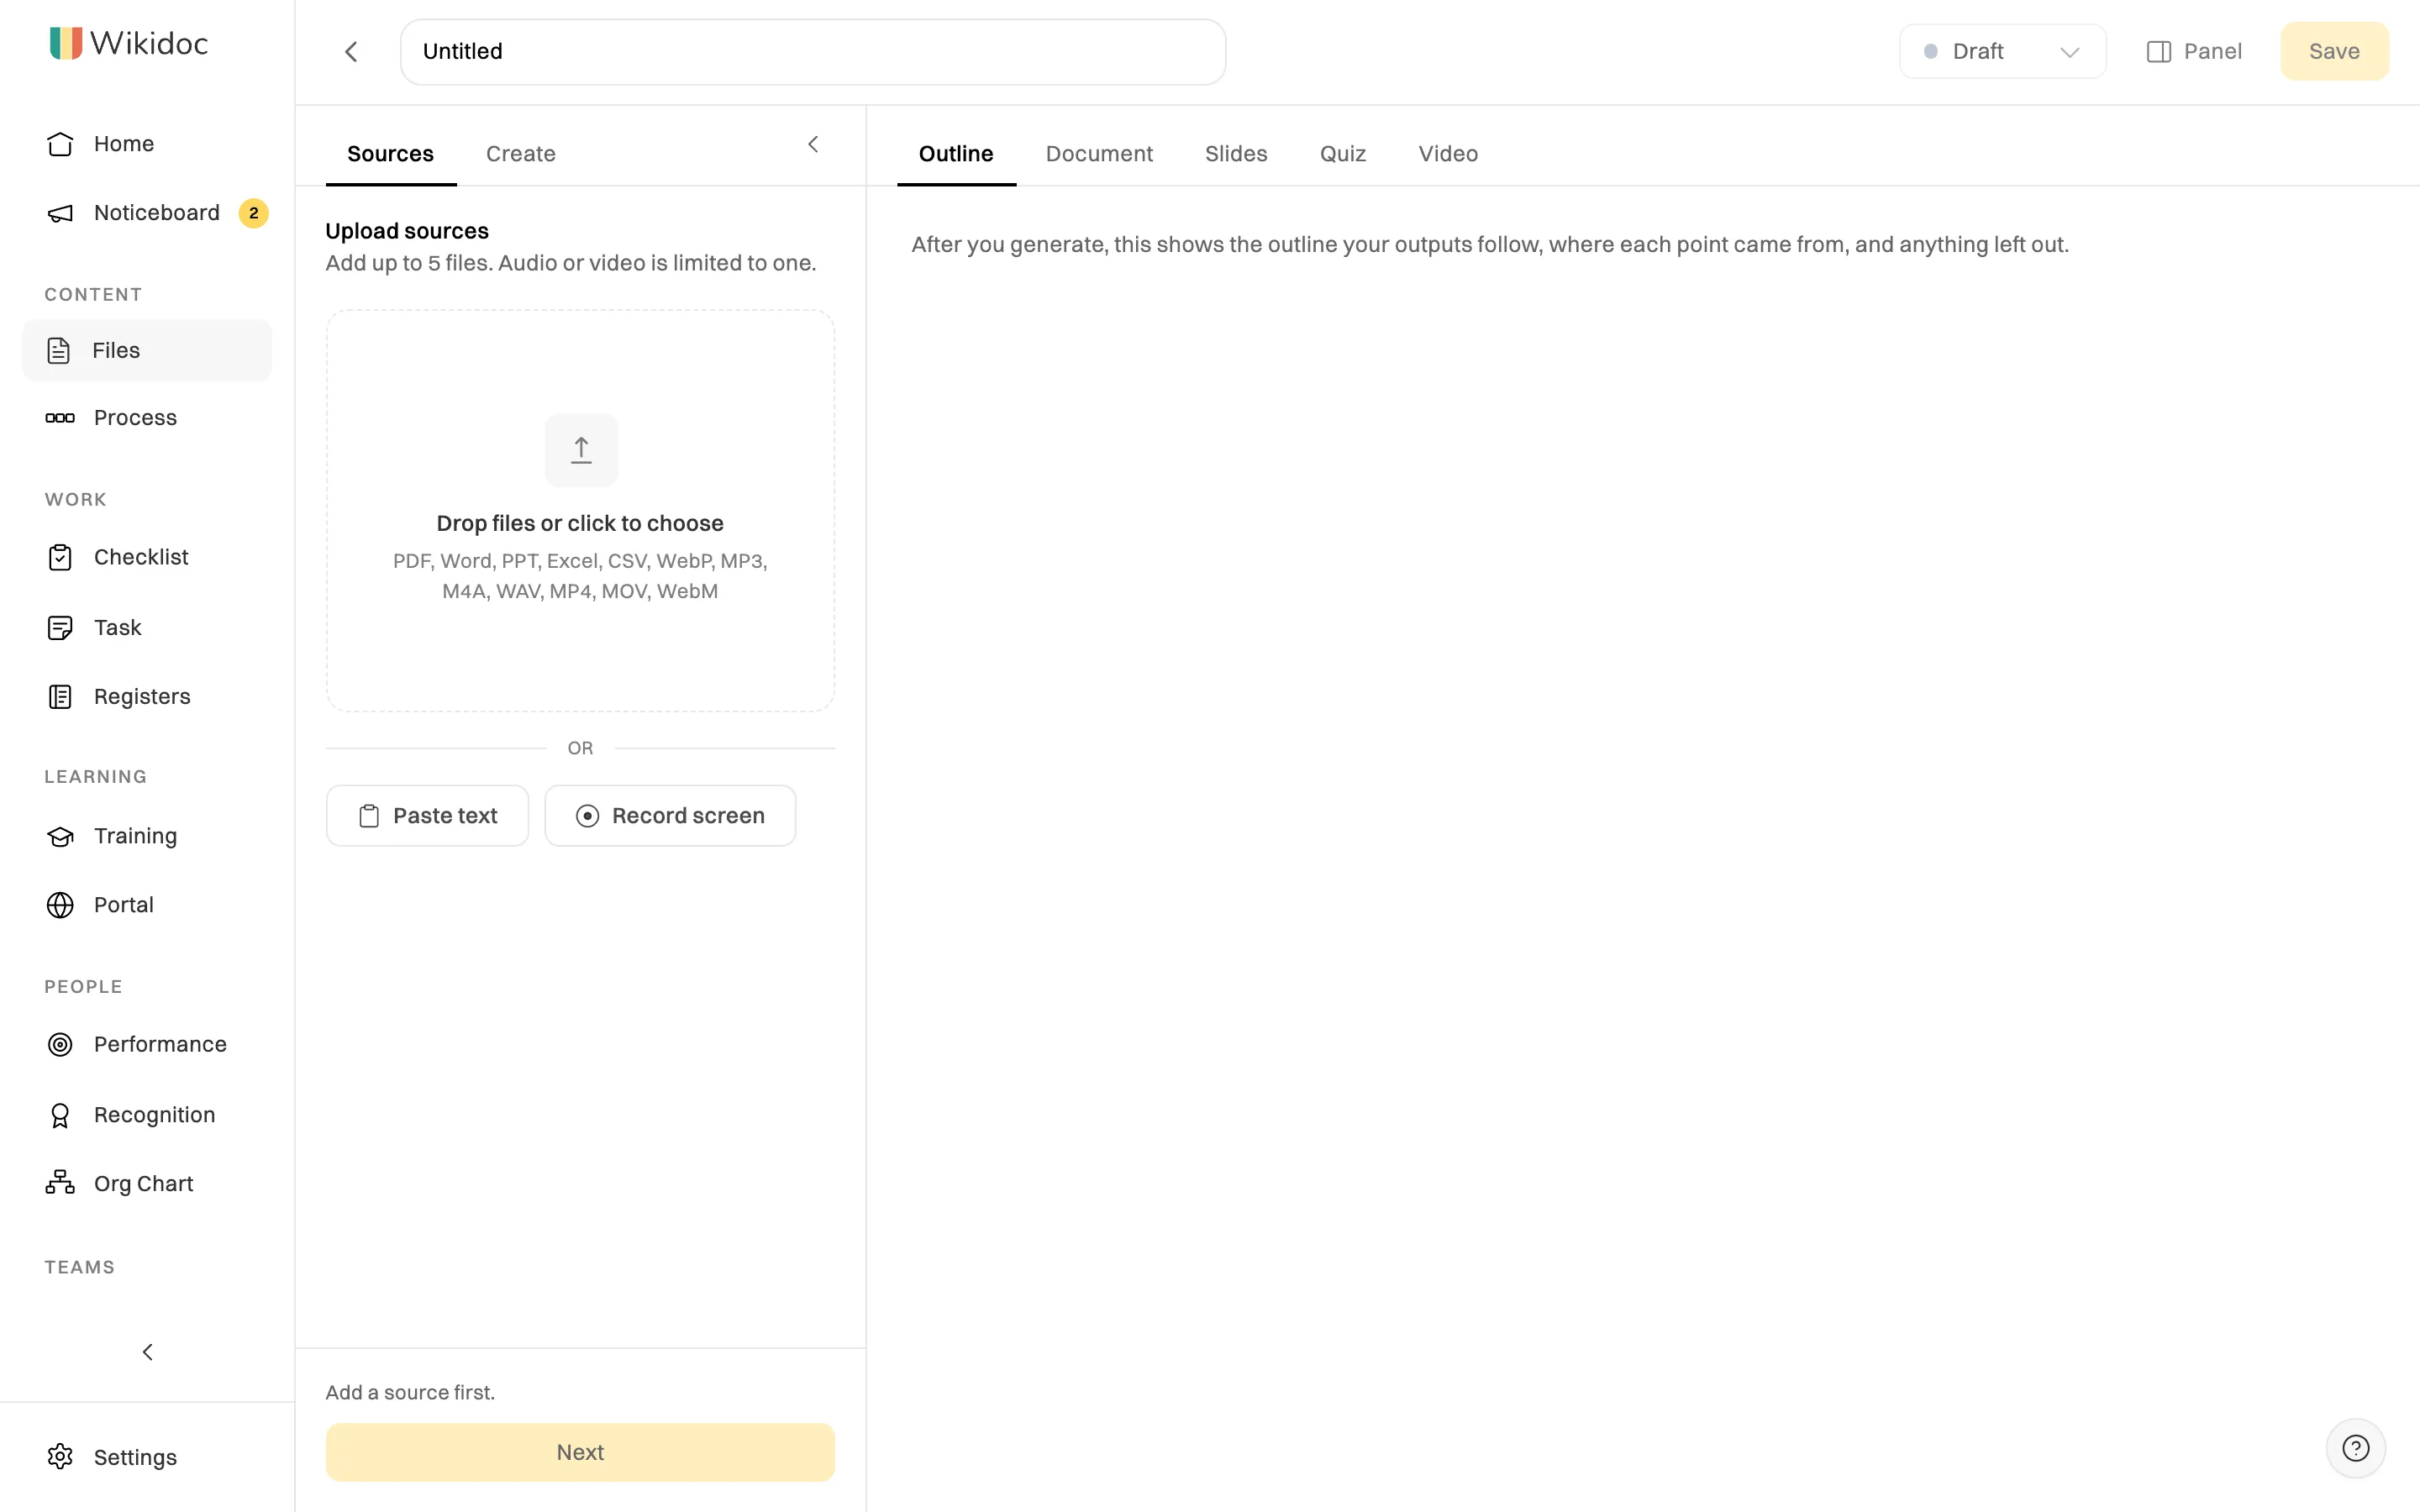
A new document on the Sources tab in Wikidoc, with Upload sources, Paste text and Record screen

Add the policies, procedures or recordings the training is based on.

Click Next.

Step 2: Tick Slides, and a Quiz

On the Create tab, tick Slides. Tick Quiz as well to get multiple-choice questions covering every learning objective. Under Slides, choose:
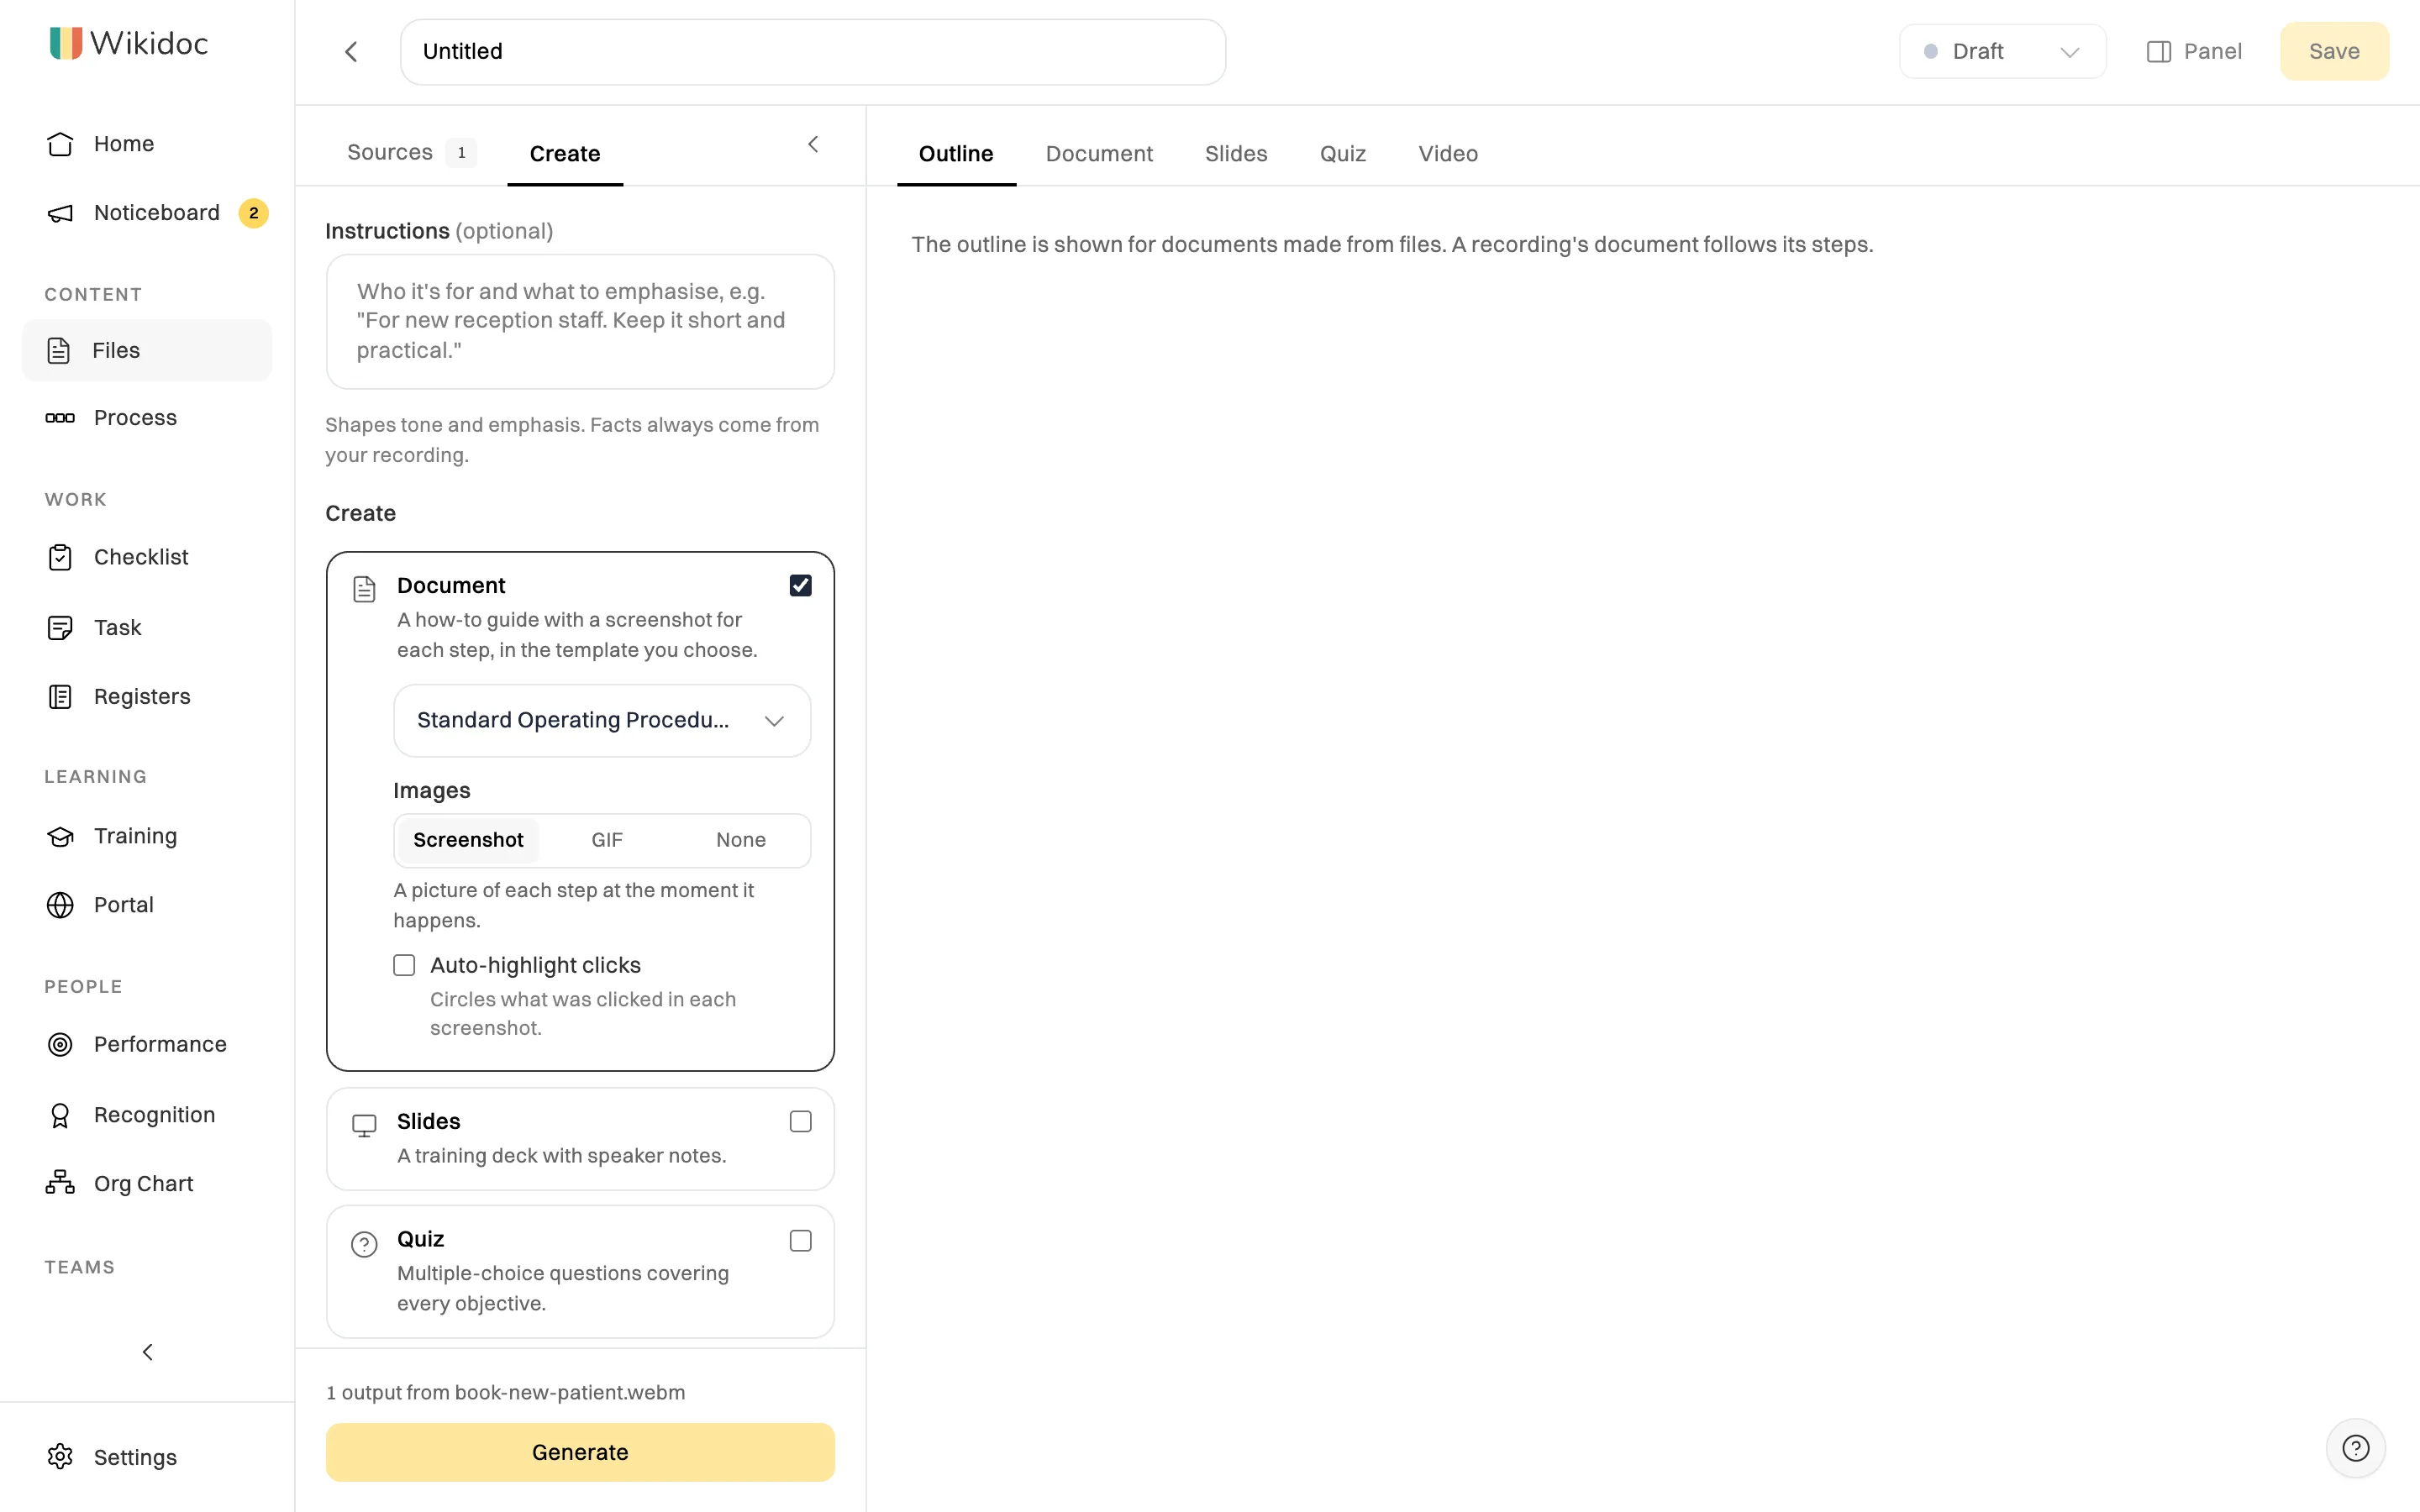
  • The kind of deck: Training session (the default) for a full lesson, Briefing for a shorter update, or Quick reference for a deck people look things up in.
  • The length: Shorter, Standard length or Longer.
  • Template: the look of the deck. It starts as your organisation’s default.

The Create tab in Wikidoc with Instructions, the Document option, and Slides and Quiz options below

Choose Slides and Quiz on the Create tab.

Add Instructions to set the audience and tone, for example “For new front-of-house staff. Practical, with examples of real refund situations.” Then click Generate.

Step 3: Check the outline

Wikidoc plans from your sources first. The Outline tab shows the plan the deck is built from, and each point shows which file, and which part of it, it came from. For the refund deck, you’d expect sections such as When we give refunds, Refund limits and approvals, No receipt? and Recording the refund, each linked to the paragraph of the procedure it came from. That’s how you know the training says what your policy says.
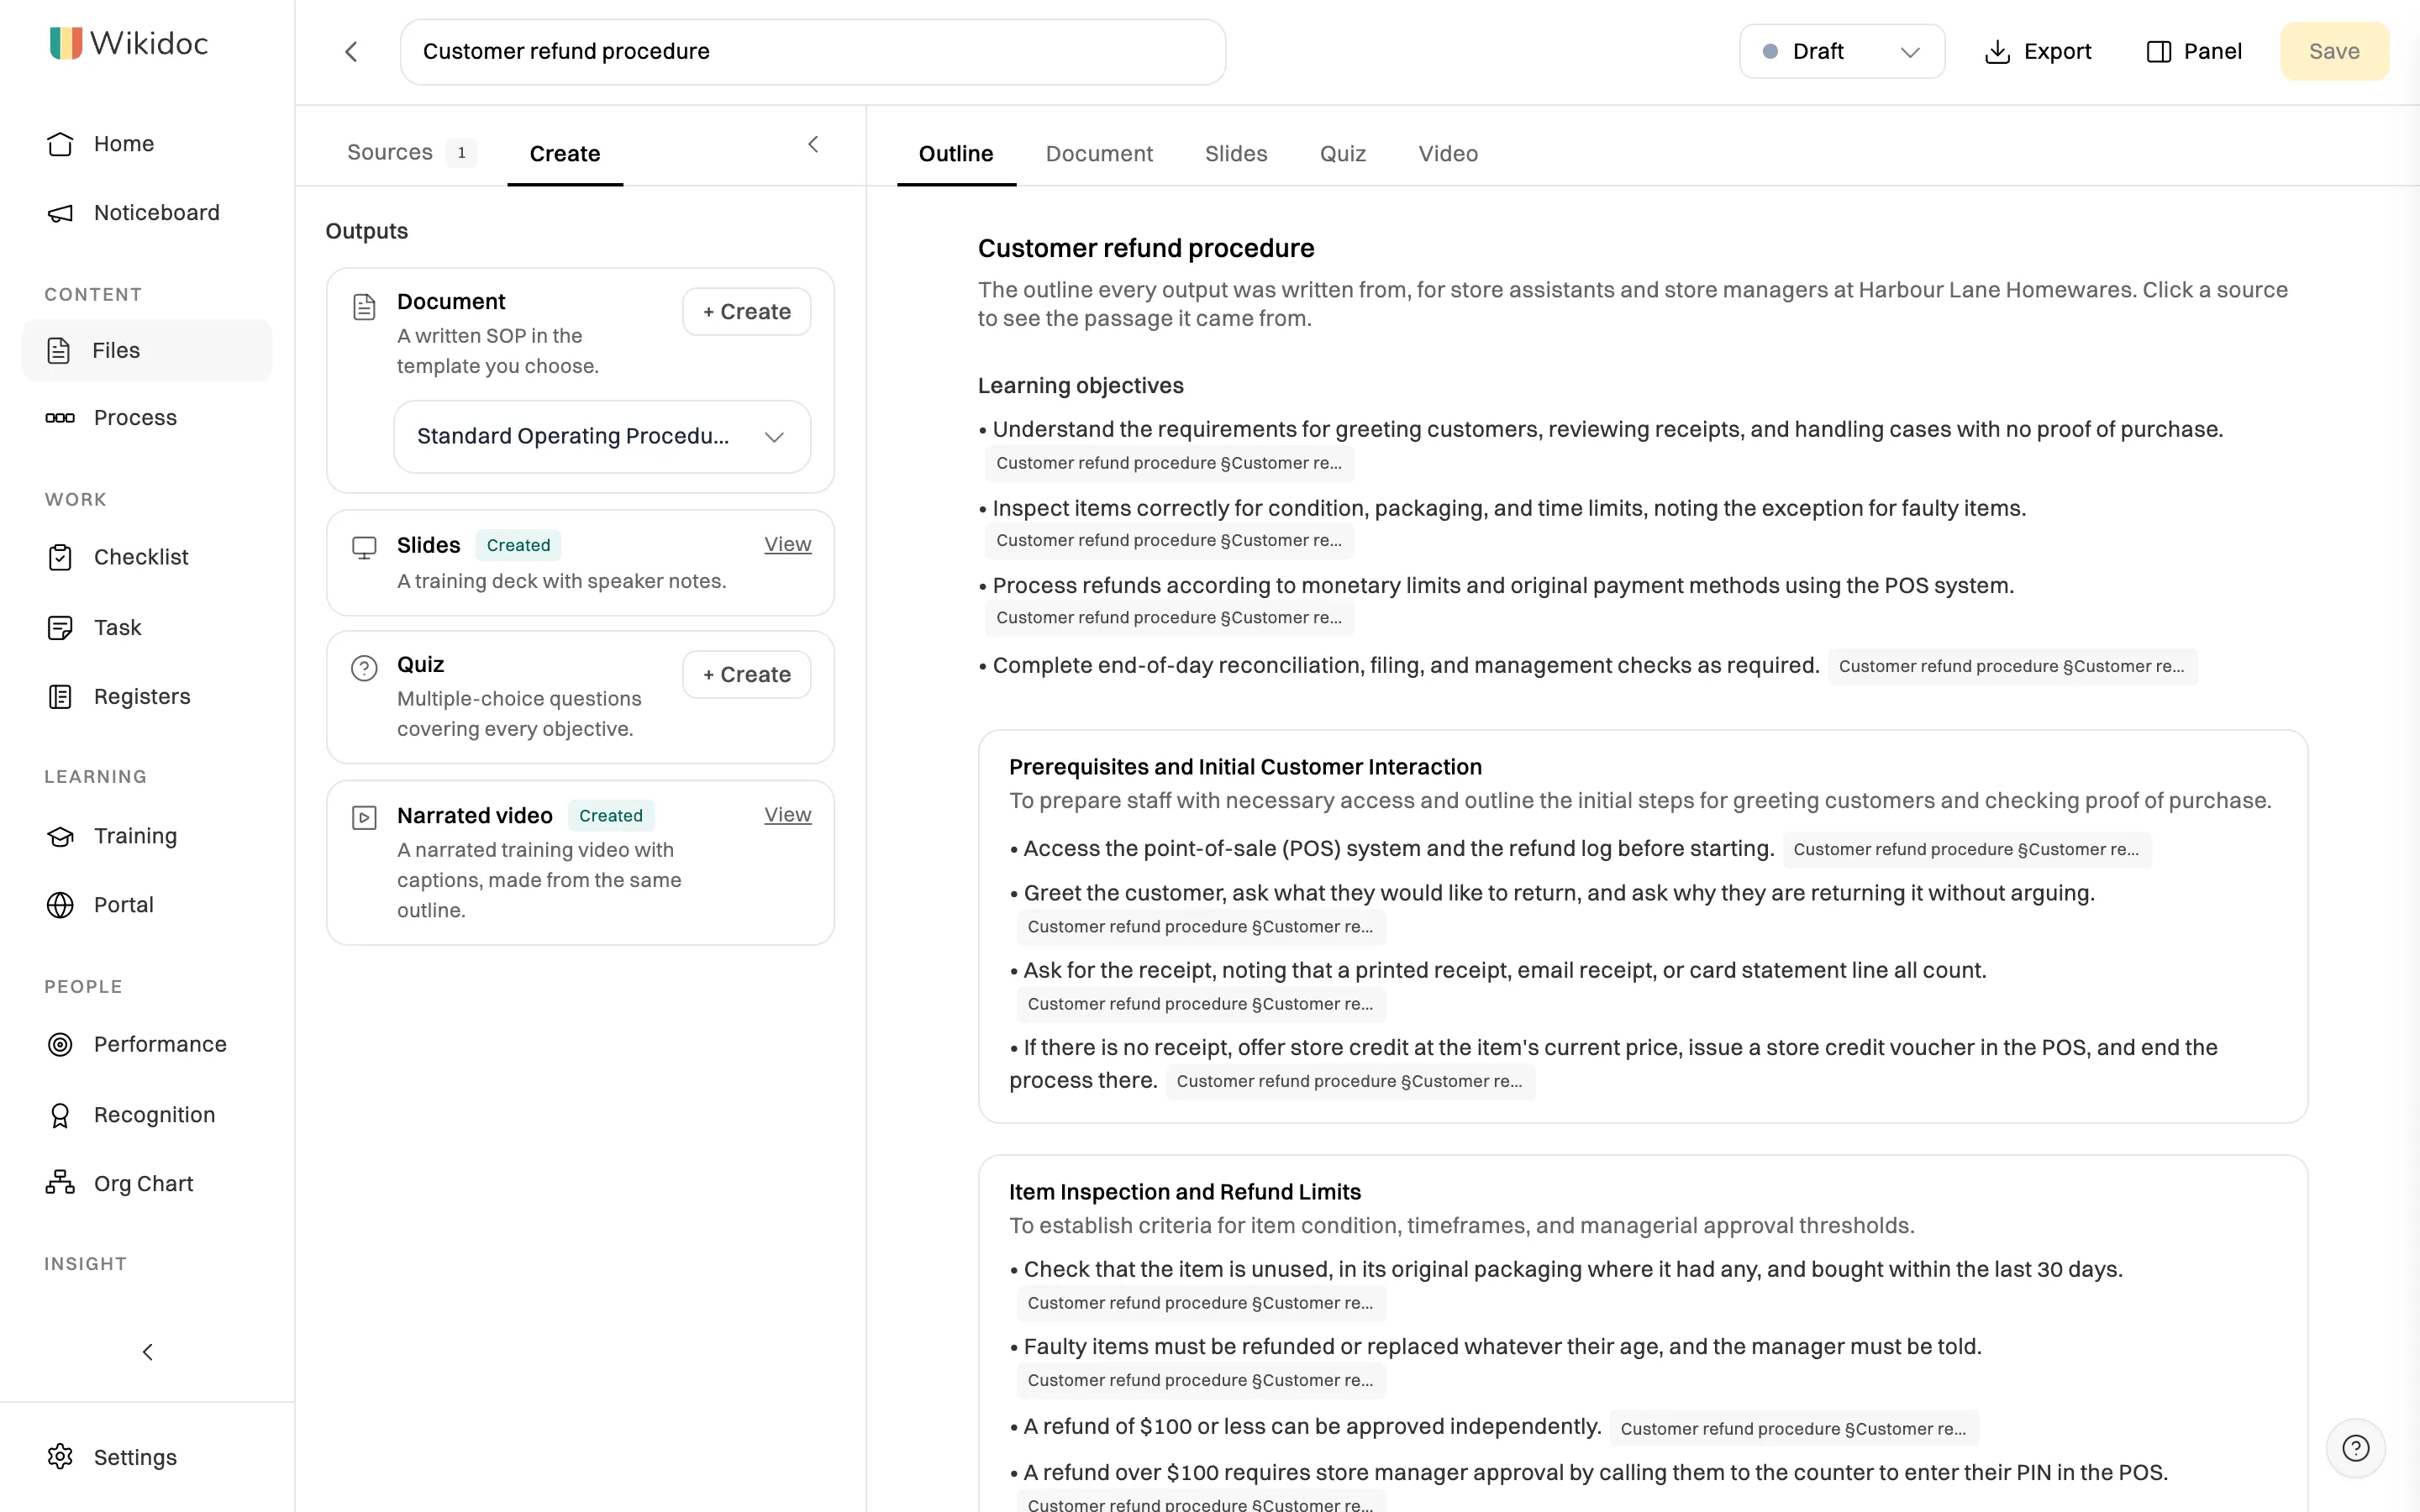
The Outline tab for a Customer refund procedure document in Wikidoc, with learning objectives and sections, each point tagged with the passage of the procedure it came from

Every point in the refund outline is traced back to the procedure.

Step 4: Review the deck

Open the Slides tab. The deck has a cover, the learning objectives, a section for each part of the outline, knowledge-check questions between sections, and a summary. Each slide has speaker notes. In the refund deck, you’d see the refund limits as a comparison table, the approval steps as a numbered process, a callout warning never to refund to a different card, and a knowledge check such as “A customer has no receipt and wants $120 back in cash. What do you do?”
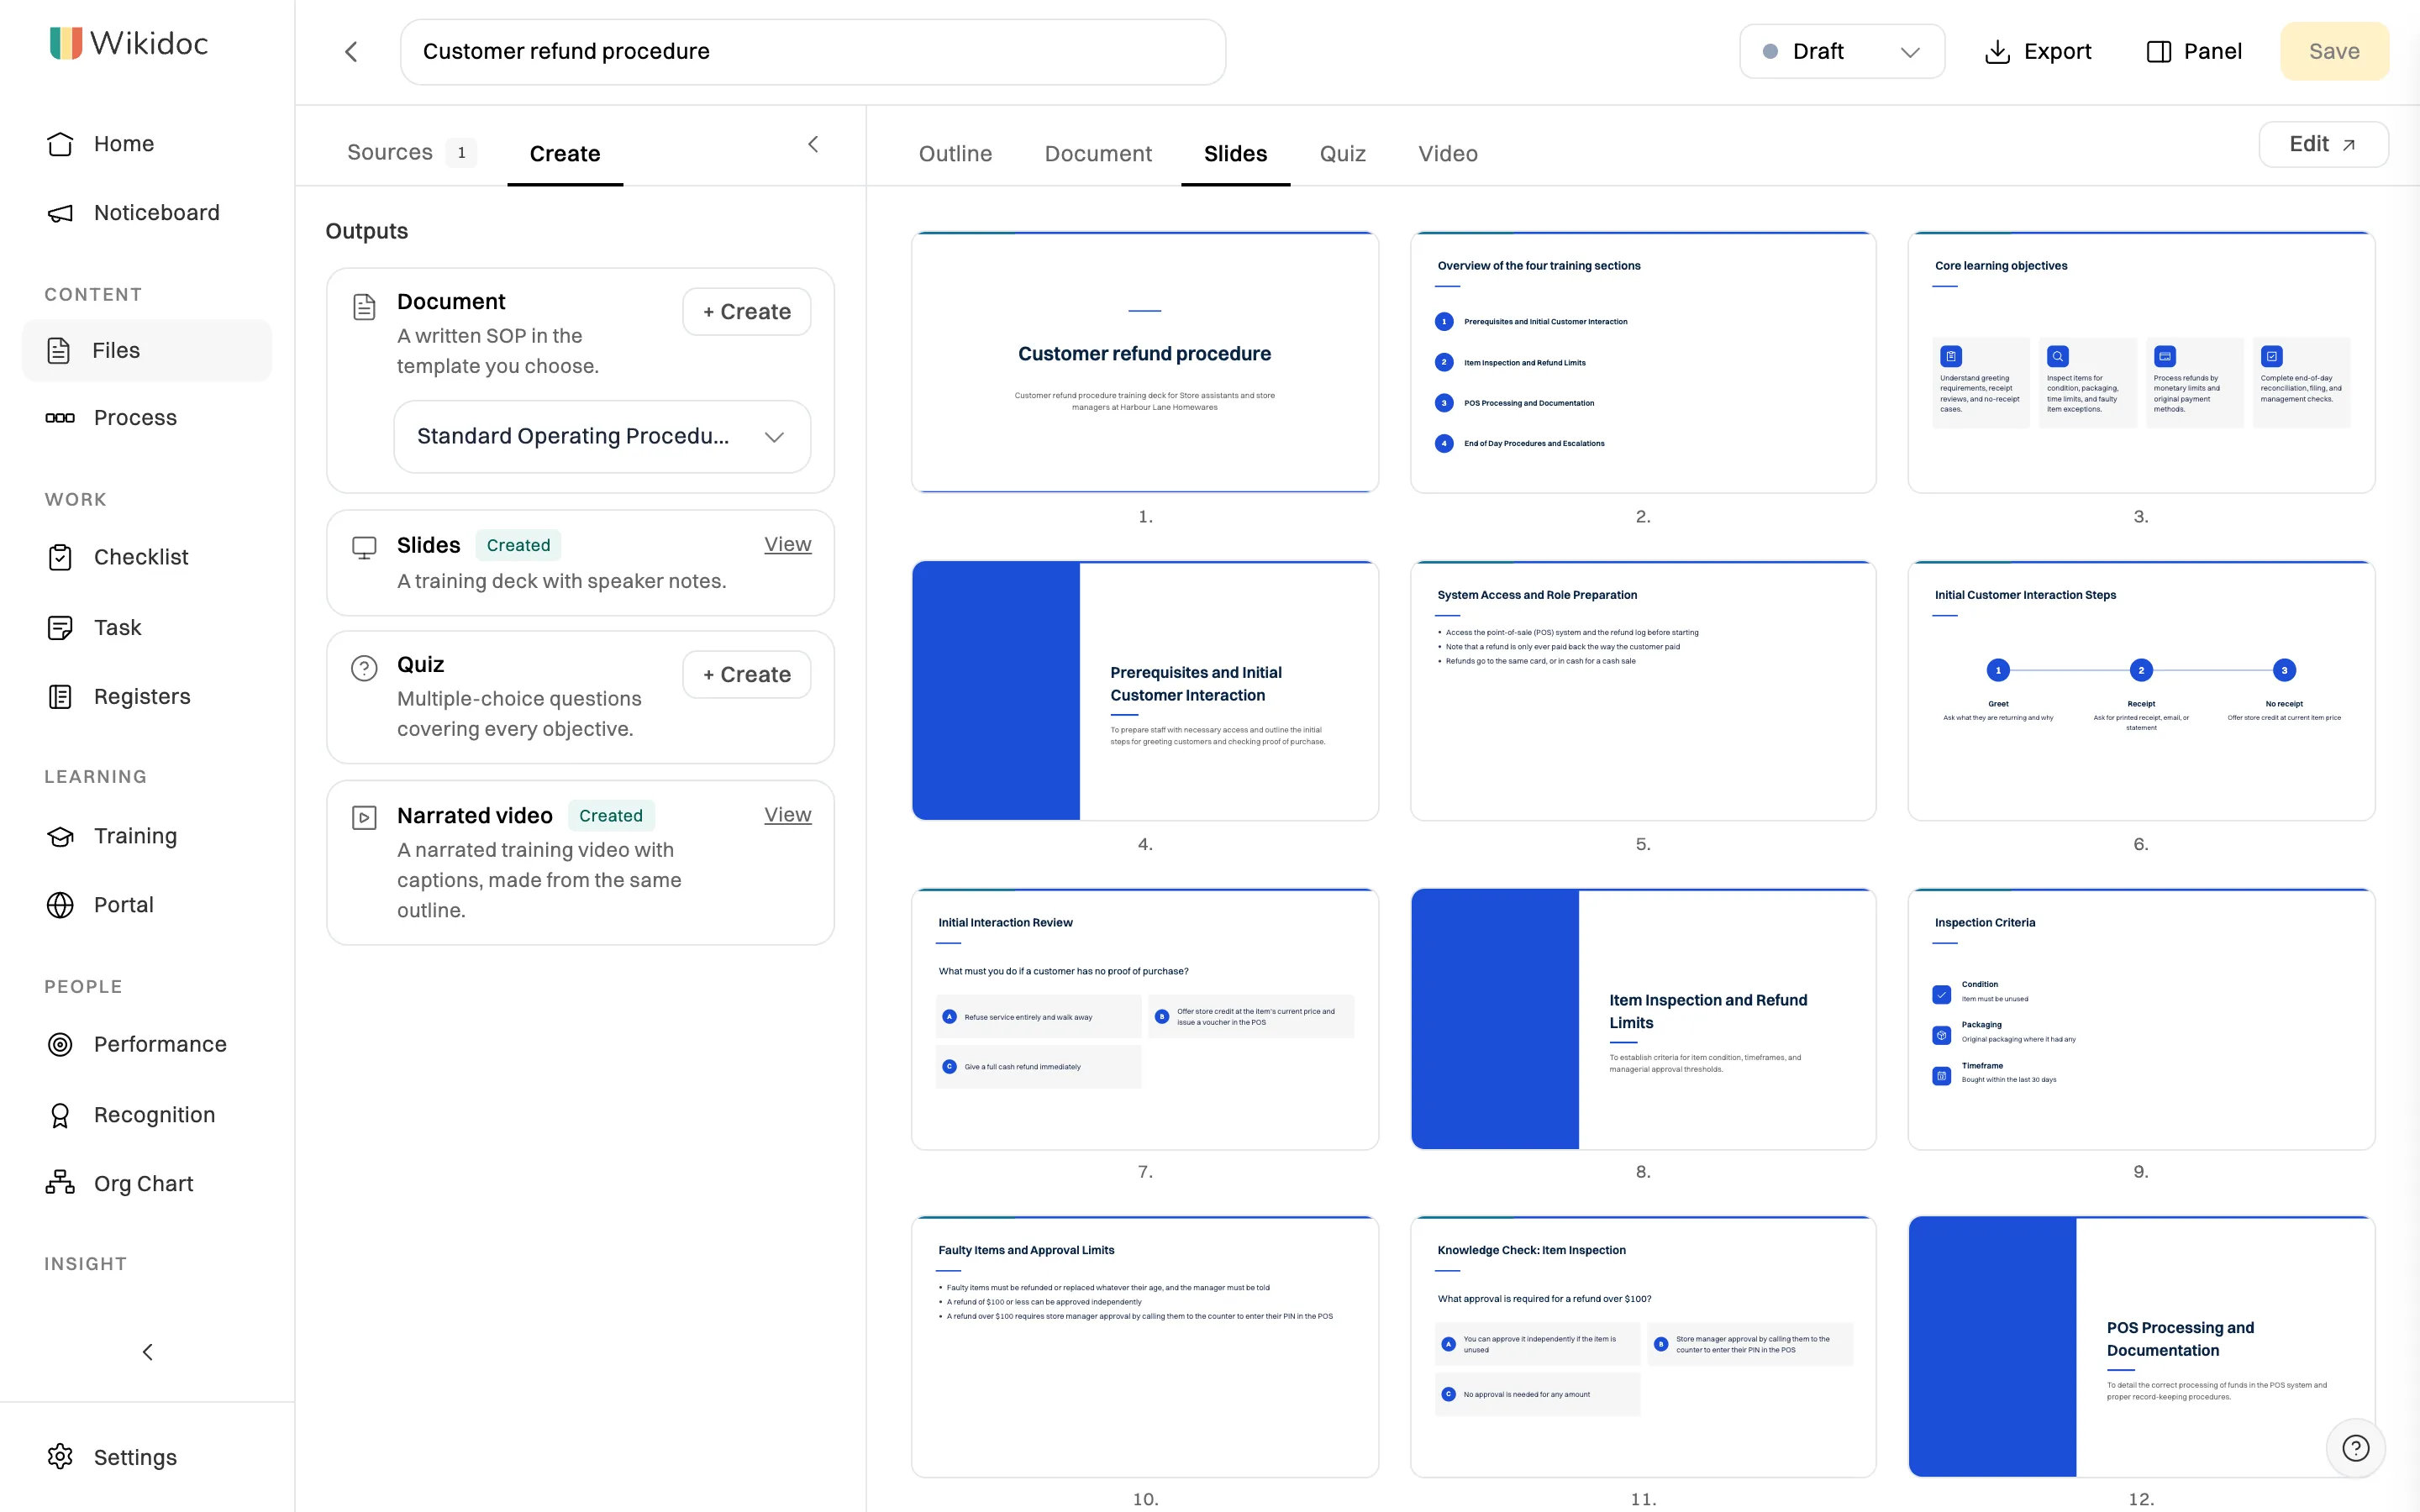
The Slides tab of the Customer refund procedure document in Wikidoc, showing a grid of slides including learning objectives, a three-step customer interaction, an inspection checklist and knowledge-check questions

The refund deck: objectives, sections, steps and knowledge checks.

Step 5: Choose a template that fits your brand

Click Template, then Change template…. There are six: Training Session, Corporate Clean, Bold Geometric, Compliance / QMS, Dark Tech and Minimal. The slides are laid out again in the new style and keep your text. You can also pick the slide size: widescreen, standard or A4 landscape for printing.
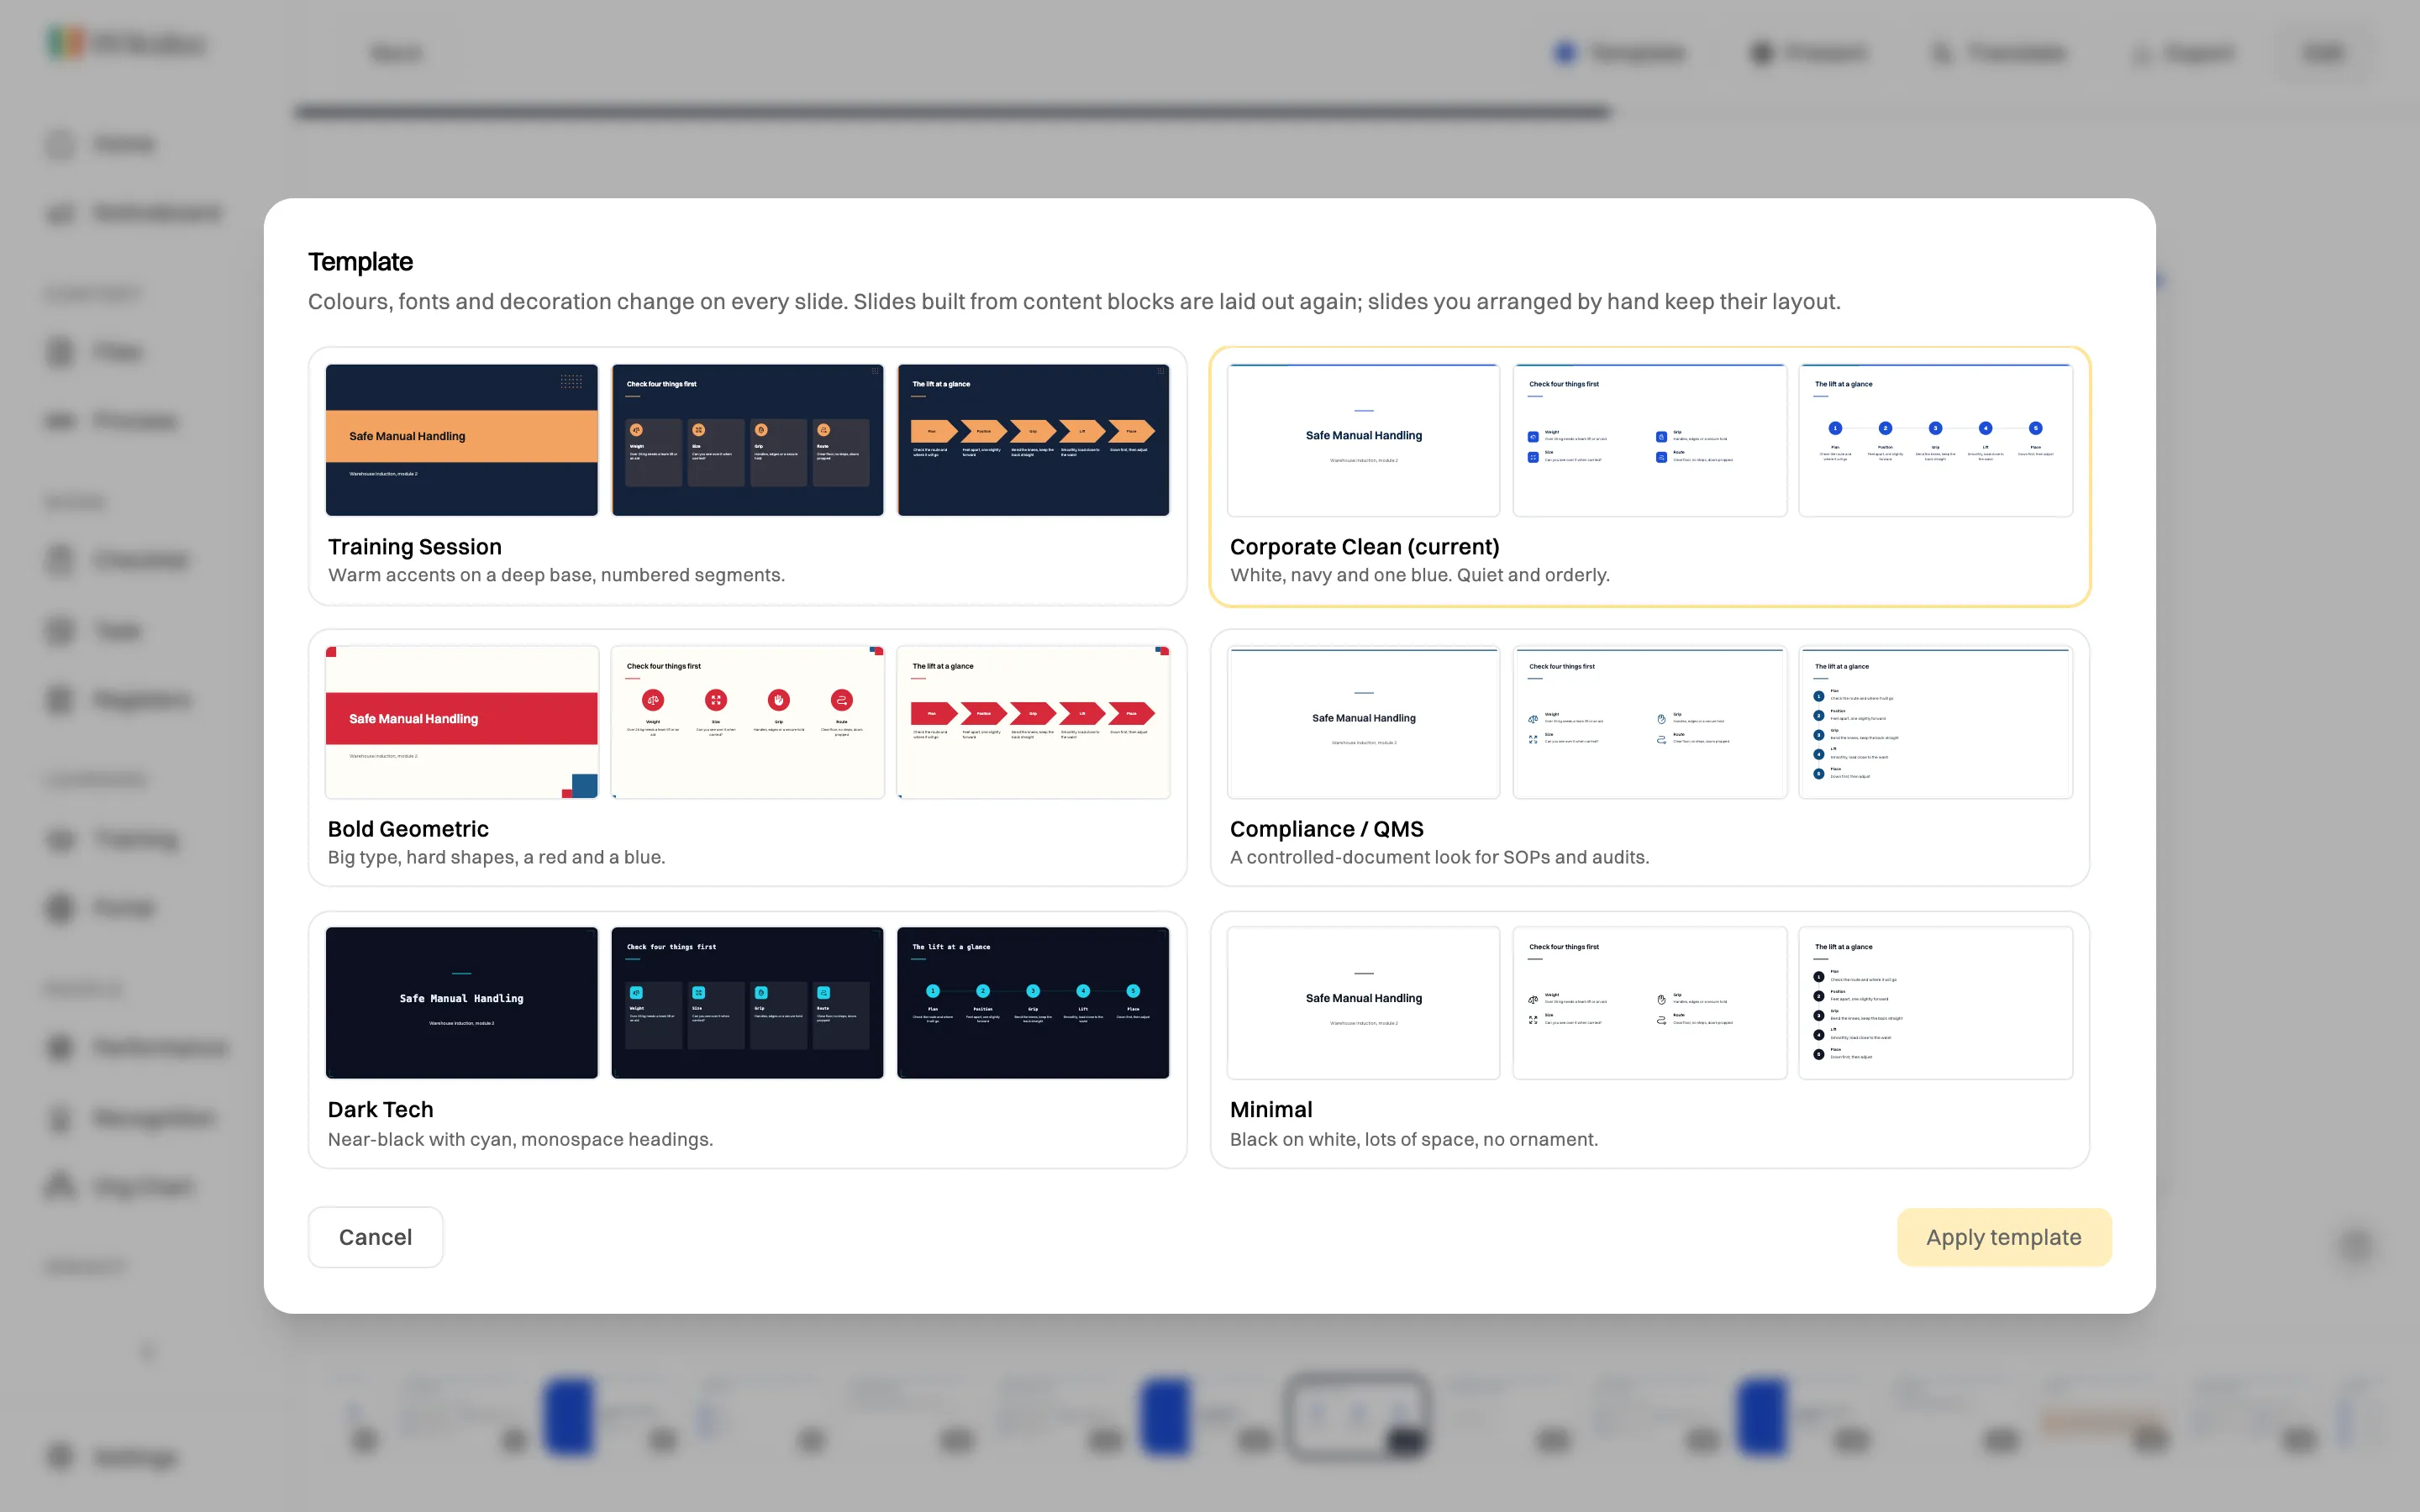
The Wikidoc template window with six slide templates, each previewed as three slides

Six templates, from Corporate Clean to Compliance / QMS.

Admins can set the default template for every new deck in the organisation, so all your training looks consistent.

Step 6: Edit the slides

Click Edit. Click any text to change it, or use Content to edit a slide as a form. Layout switches a slide to another arrangement, such as numbered steps instead of bullets, and brings the text with it. From the toolbar you can add text, images, shapes, icons, tables and charts, and blur or highlight part of a screenshot.
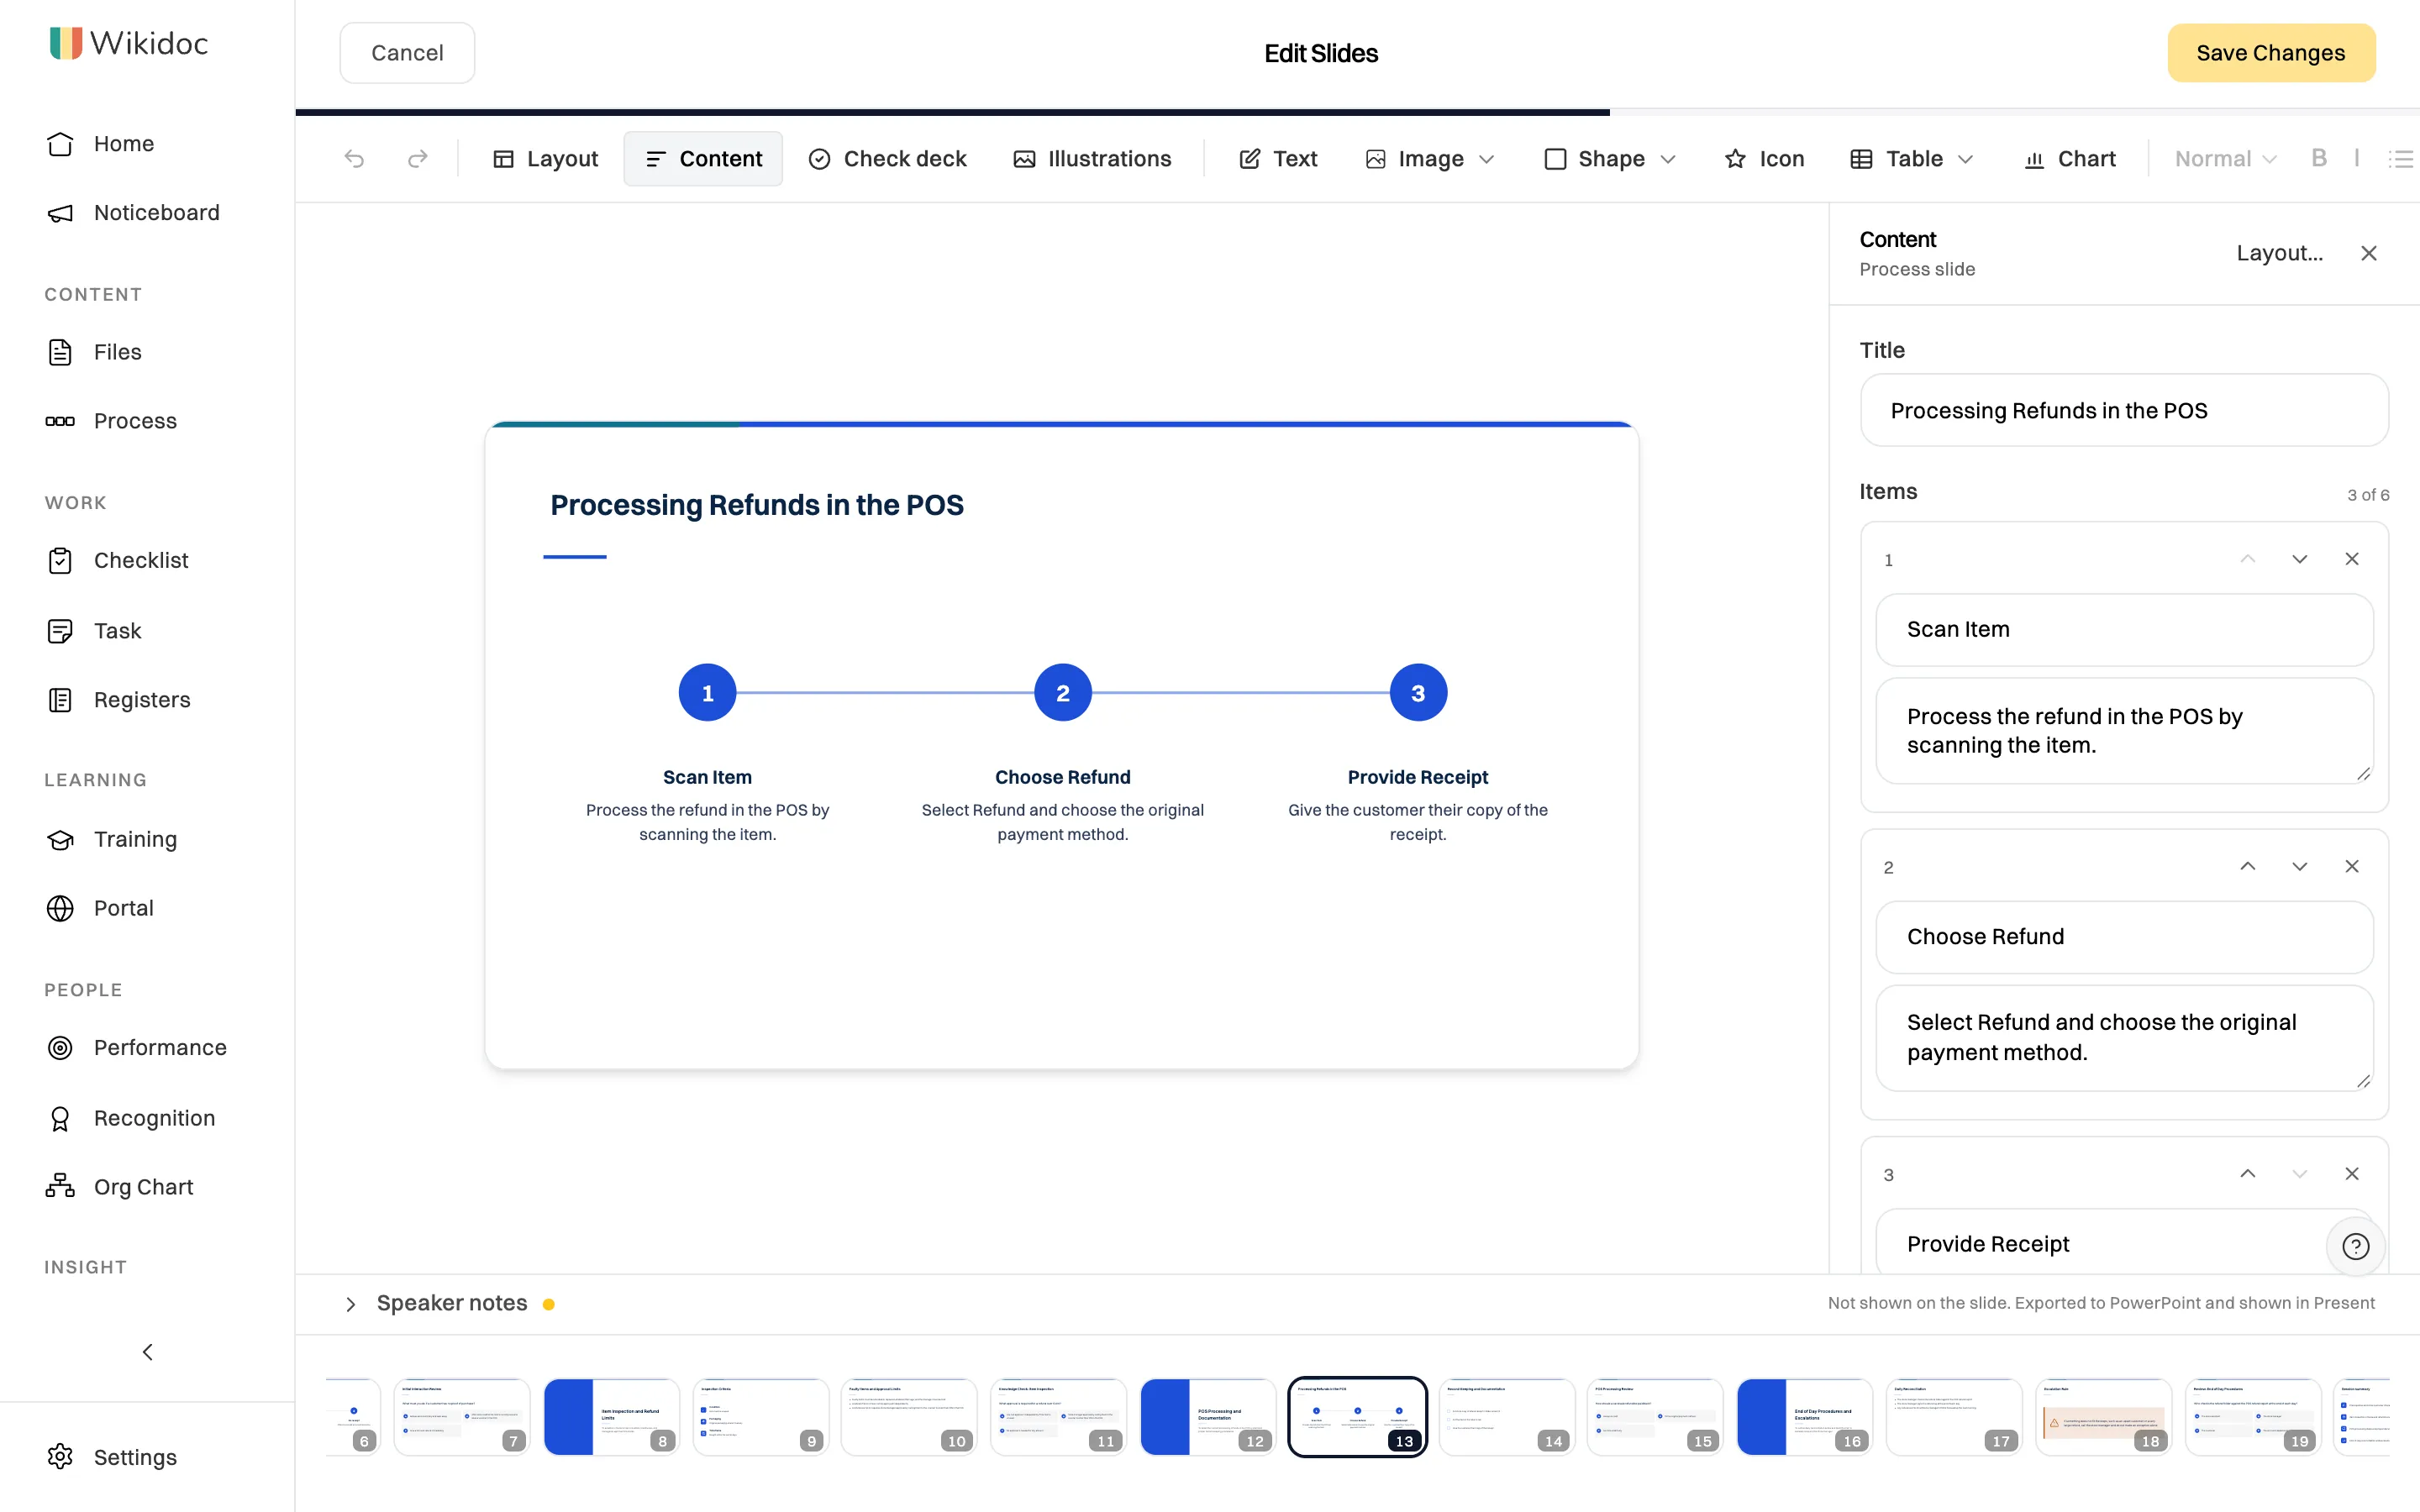
The Wikidoc slide editor with a Processing Refunds in the POS slide showing three numbered steps, and the Content panel with the title and each step’s text

Edit text, layouts and speaker notes, then Save Changes.

Before you finish, click Check deck. It finds text that doesn’t fit, colours that are hard to read, and the same layout used too many times in a row. On Pro and Team, Illustrations adds AI pictures to the cover and section slides in the template’s style.

Click Save Changes.
Step 7: Present, export, or add the quiz

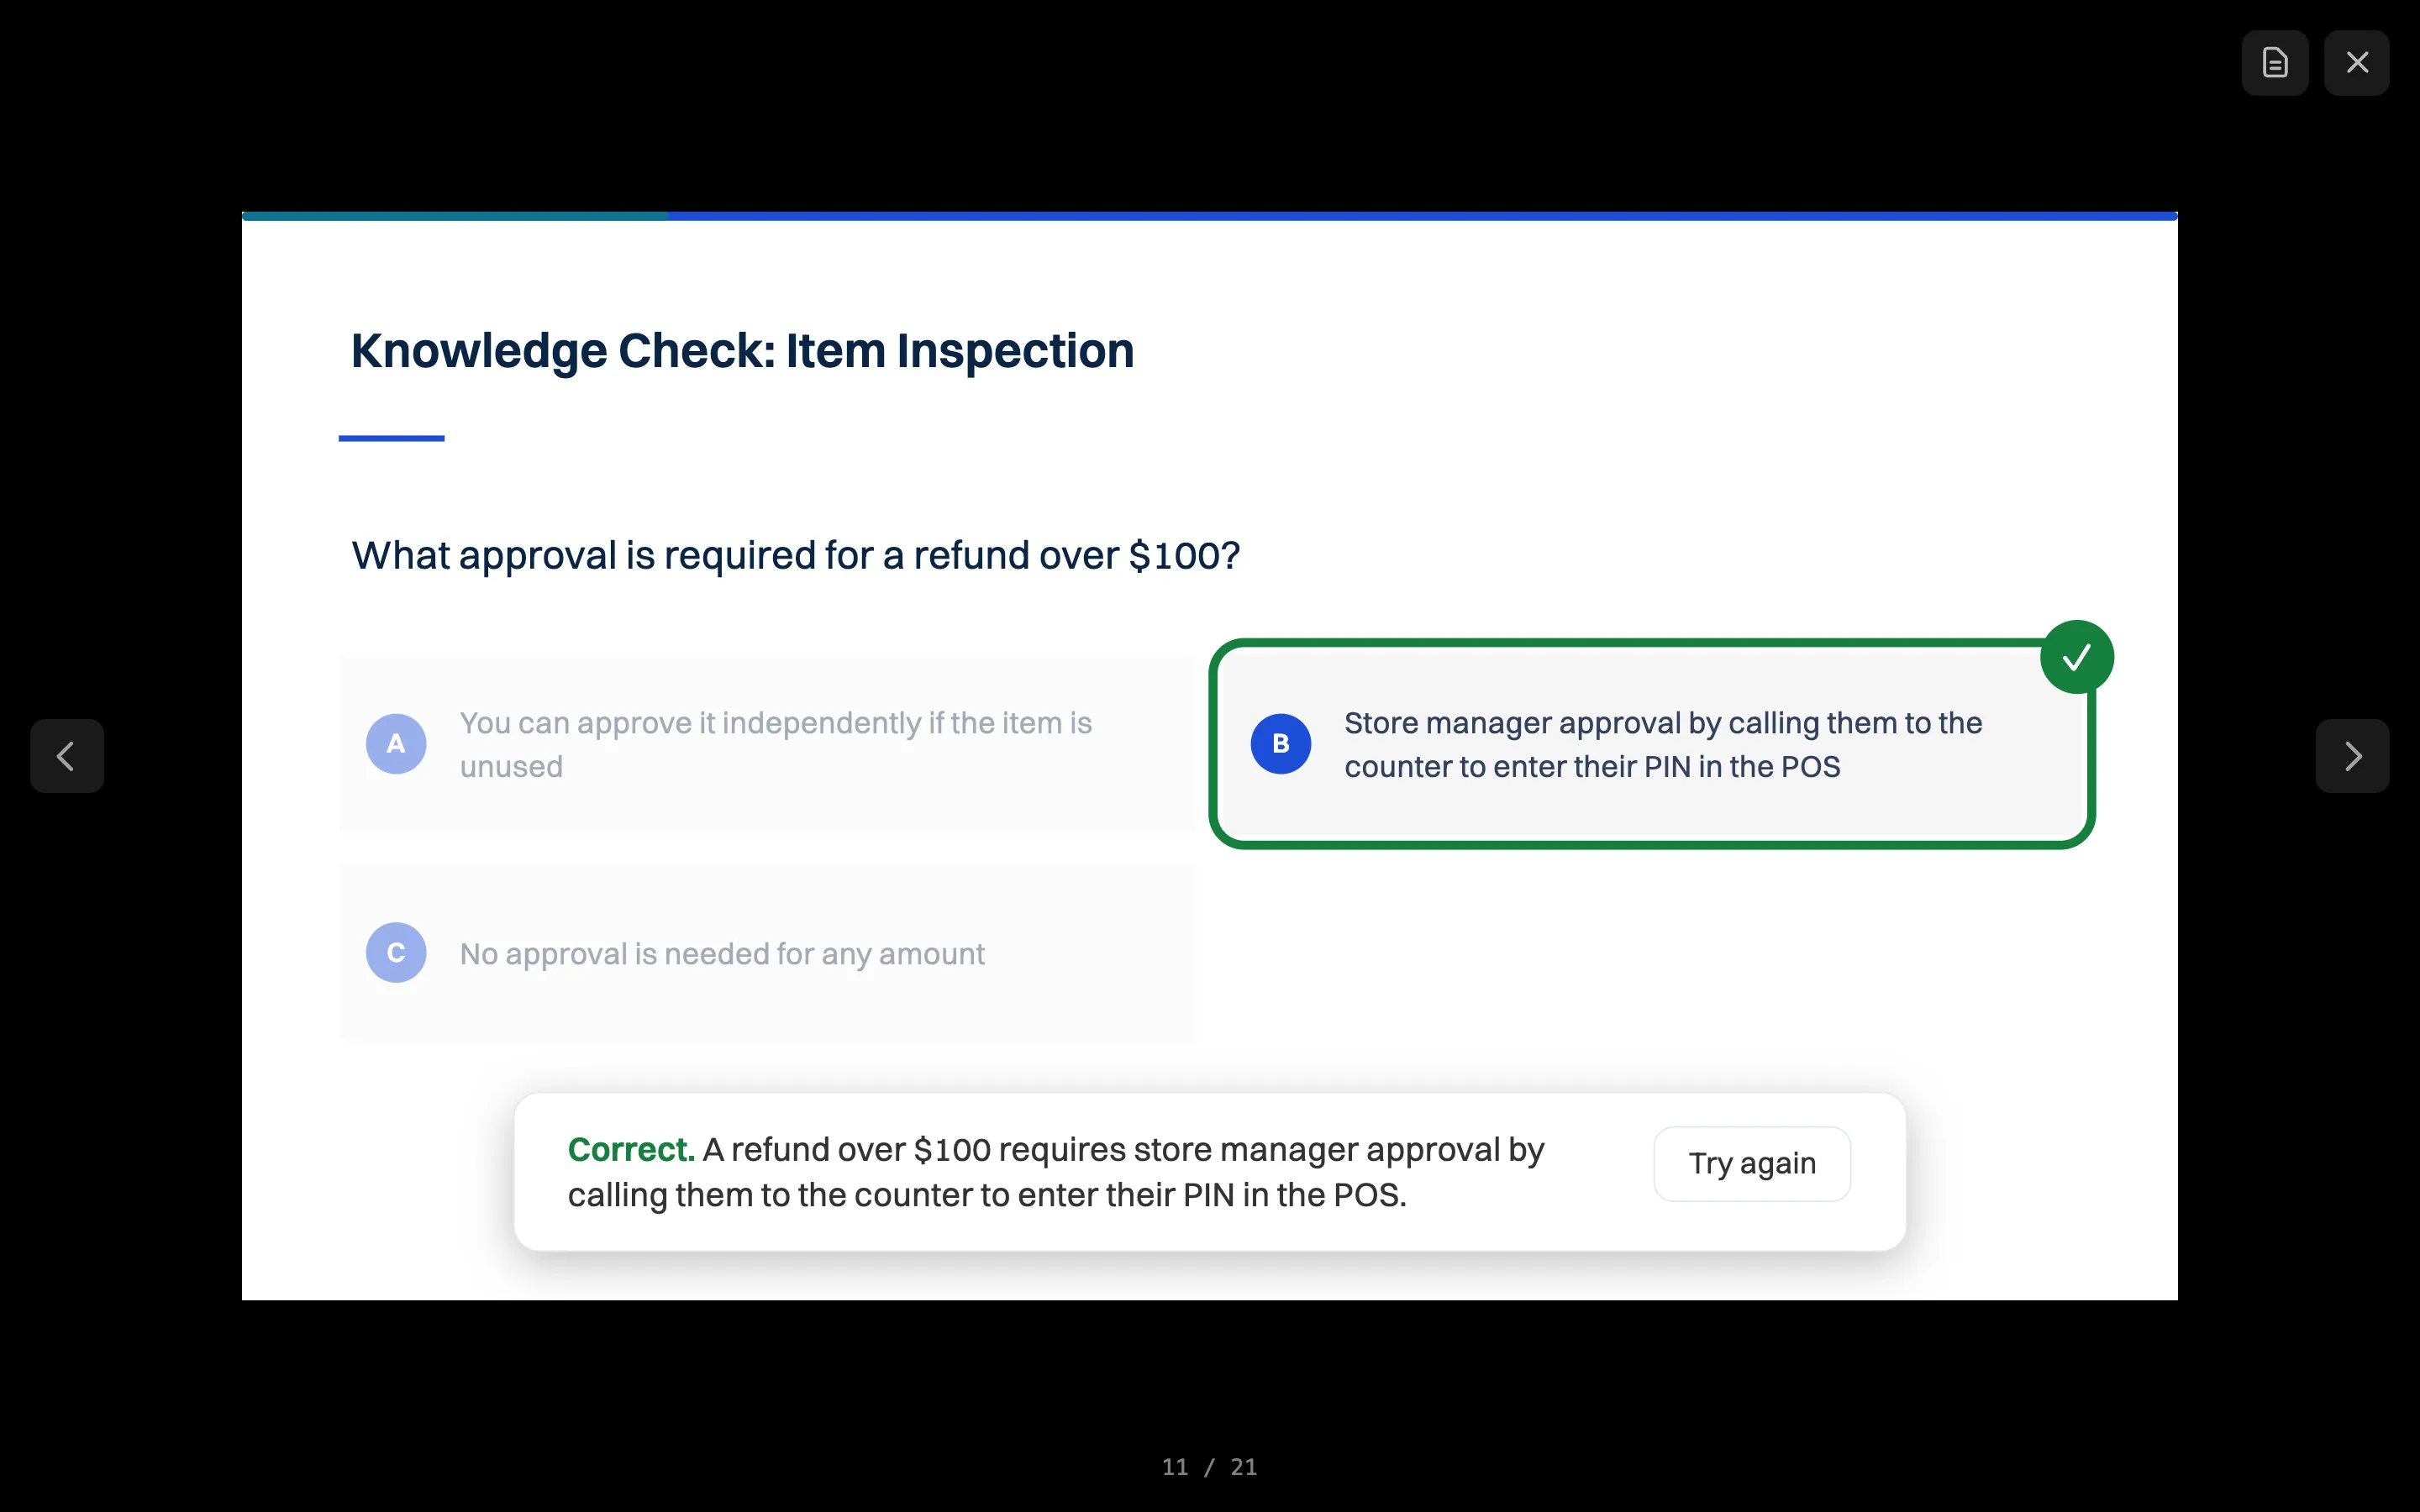
  • Present shows the deck full screen. Press N for your speaker notes. Knowledge-check slides are interactive: click an answer to reveal whether it’s right.
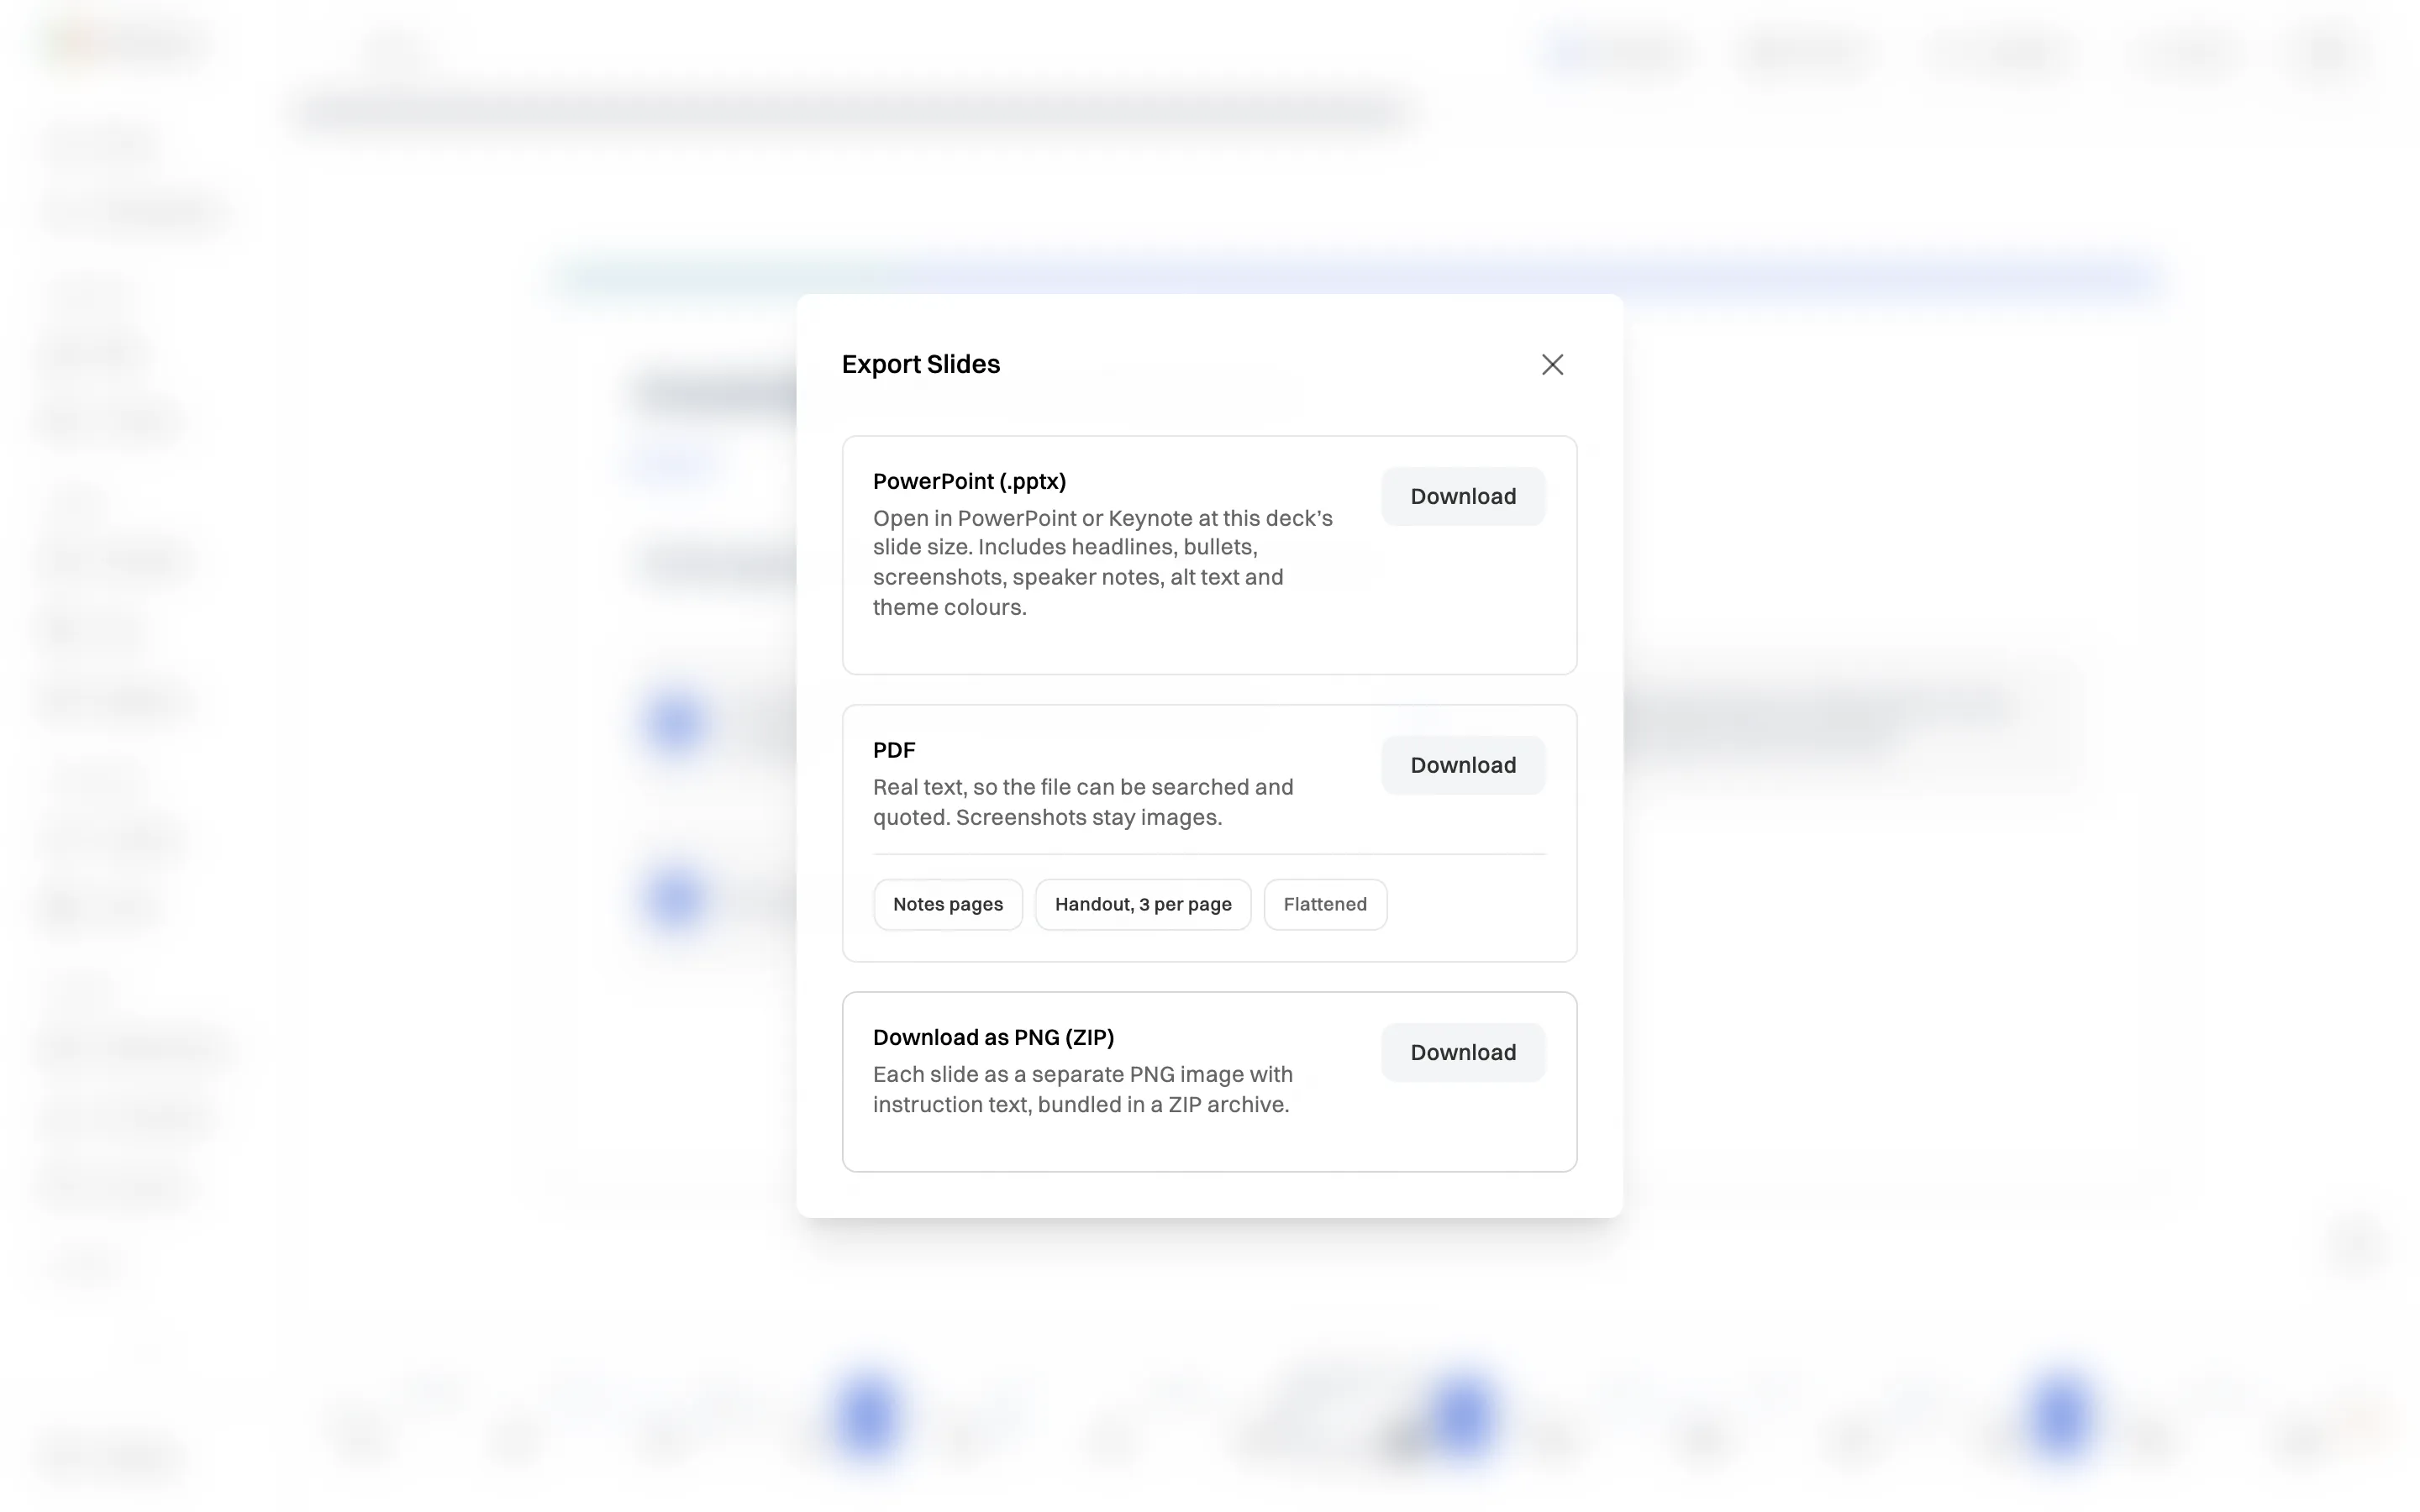
  • Export downloads PowerPoint (.pptx) with editable text, tables, charts and speaker notes, a PDF (including notes pages or a 3-per-page handout), or each slide as a PNG.
  • The Quiz tab holds the quiz. Click Edit to change questions, answers and the passing score (80% to start).

A refund knowledge-check slide in Wikidoc’s Present mode asking what approval is required for a refund over $100, with the correct answer, store manager approval, marked and a Correct explanation below

In Present mode, knowledge checks are interactive: click an answer to reveal the explanation.

The Export Slides window in Wikidoc with PowerPoint (.pptx), PDF with notes pages and handout options, and Download as PNG (ZIP)

Export the refund deck to PowerPoint, PDF or PNG.

For self-paced training, convert the document into a training module: the slides and quiz go in together, with a passing score, certificates, and completion tracking when you assign it on the Team plan. You can also export it as SCORM 1.2 for another LMS.

Tips for training decks that work

  • Feed it the real policy, not a summary. The more complete your sources, the better the deck.
  • Use Briefing for change updates. When only one part of a process changes, a short briefing beats re-running the full session.
  • Keep the knowledge checks. They’re the part people remember, and they show the presenter who’s following.
  • Use real scenarios in knowledge checks. For refunds, ask about the edge cases staff actually face: no receipt, sale items, a refund above their limit.
  • Pair the deck with a video for people who can’t attend. See How to Create Company Training Videos with AI: it’s made from the same sources in the same document.

Frequently asked questions

Can AI create a training presentation from a document?

Yes. Upload a Word, PDF, PowerPoint or Excel file, or a recording, and Wikidoc plans a lesson-structured deck from it, with learning objectives, a slide per topic, speaker notes, knowledge checks and a summary.

Can I export the AI presentation to PowerPoint?

Yes. Export a .pptx that opens in PowerPoint or Keynote, with editable text, tables and charts, speaker notes, alt text, and the template’s background on the slide master. PDF and PNG exports are available too.

Can I use my company’s branding?

Choose from six templates, and Admins can set an organisation-wide default so every new deck starts with the same look. You can also edit any slide, add your own images, and export to PowerPoint to apply your own master.

How is this different from a general AI presentation maker?

General tools write from a prompt. Wikidoc writes from your own policies and recordings, shows which source each point came from, adds knowledge checks and a quiz, and turns the deck into tracked training.

What should a training presentation include?

Learning objectives, one idea per slide, real examples from your business, speaker notes, knowledge checks between sections, a summary and a final quiz. Wikidoc builds this structure automatically from your source documents.

Is the AI training presentation maker free?

Yes. The Free plan includes three slide decks and three quizzes. Try it from the free AI slide generator. Pro and Team have no limit.